
We have been creating customized pieces of jewelry for our customers since 1959, and in that time, we have never made the same piece more than once. When you work with us, you will have 100% control over the end result, and we guarantee that you will be 100% satisfied with the results.
We pride ourselves as being one of Florida’s premier custom jewelery shops, and we strive to maintain our reputation for excellence through our custom creation process. This process has been fine tuned over the decades to ensure that, in the end, you get exactly what you want.
STEP 1: Brainstorming
Design Phase
When you first arrive in our shop for your initial consultation, one of the first things that we are going to talk to you about is your budget. No judgement - how much do you want to spend?
We are one of the best custom jewelry shops around, but affordability and flexibility are both things that we value at Travis Jewelers. If you need to create something beautiful on a tight budget, we are prepared to help you do that!
Also included in your initial consultation will be a brief orientation for what is to come. We want to give you a realistic understanding of our process and get you comfortable with the fact that you really will have absolute control over this project. Our job is to take your idea and make it real.
Our shop is completely open—you will be able to see and hear our talented team of designers hard at work all around you. This is important to us because the last thing we do before moving on to step 2 is pair you with one of our designers. It is important that you and your designer share similar aesthetic sensibilities, so we like to think of ourselves as pretty good matchmakers.

STEP 2: Meet Your Designer
Design Phase

You should set aside about an hour for your initial meeting with your designer. In this meeting, you and your designer will establish a shared aesthetic vocabulary. One of the first things that you will discuss is the type of materials that you are interested in using in your piece. Are you a fan of that classic gold look? Or are you looking for something a little more uncommon, like Damascus Steel?
The type of materials that you choose will go a long way towards determining cost, so you should expect to be circling back to delve deeper into your expected budget. Again, financial flexibility is very important to us. If you are hoping to achieve a particular ‘look,’ but you are unsure whether or not it will fit within your budget, we will work with you to show you more affordable materials that will provide similar aesthetics.
As you talk to your designer about the piece of jewelry that you want to create, they will begin by sketching your ideas. By the time you finish this meeting, your designer will have created a sketch of your jewelry concept. Once you have arrived at a sketch that you are happy with, it will be time to schedule your next meeting!
STEP 3: Design Consultation
Design Phase
Our design consultations are normally booked 2 to 3 weeks ahead of time. During this time, your designer will use 3D CAD modeling software to create an interactive 3D model of the sketch from your previous meeting.
You can check out your 3D CAD model remotely, or you can come in and review it with your designer by your side. Our priority is that you feel fully comfortable with the design before we go any further.
Because the model only exists virtually, it will still be very easy to for you to make changes. If you have any concerns, critiques, or issues that you want to address, this is your last chance! After this, we’re going to start physically creating your piece of jewelry. Any changes that you request after this point will cost both time and money.
That is why, before we progress to manufacturing phase, we ask our customers to put half the money down.

STEP 4: Physical Model Creation
Manufacturing Phase

Yes, before we can begin this phase, we will need you to put half the money down.
Generally, we will create this physical model in 1 of 2 ways.
The first way is with our 3D printer. This is a time-consuming, additive process, and the resulting model is extremely fragile. For this reason, we usually prefer not to let our clients handle them. To break this model would be a substantial setback for both parties.
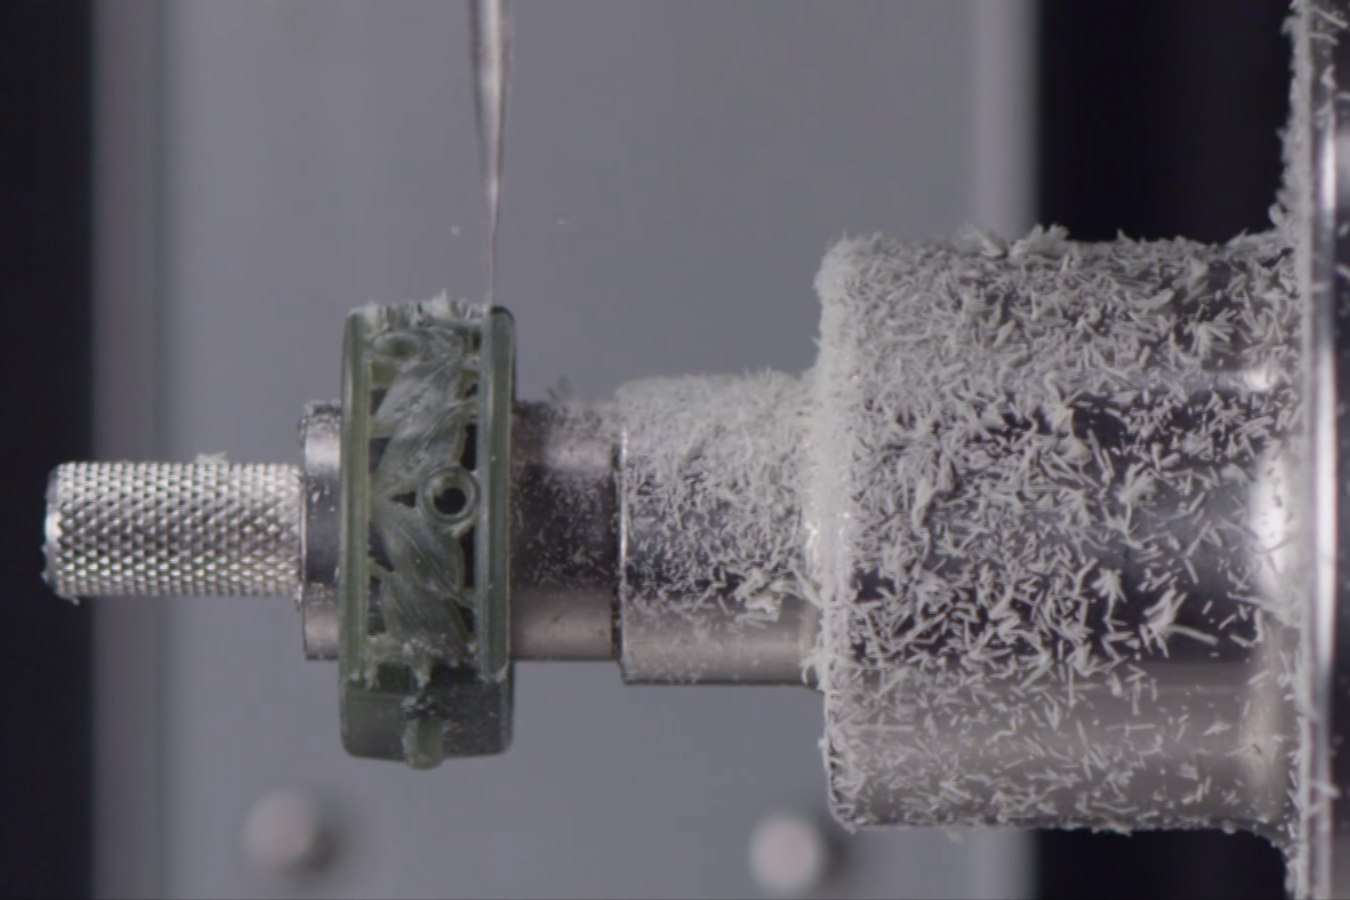
The second way is with our state-of-the-art CNC machine. Unlike 3D printing, this is a subtractive process, wherein your design is essentially cut from a block of wax-like material.
We decide how best to create our 3D models on a case-by-case basis. Every piece of jewelry demands a slightly different approach, but no matter what we choose, the end result is the same: a to-scale, 3D version of your piece of jewelry.
STEP 5: Loss Wax Casting
Manufacturing Phase
Once we have created a solid 3D model of your piece of jewelry, we will use it to create a plaster mold. This plaster mold will be put into our on-site kiln overnight at 1200° F—this is called “firing.” When the firing process is completed the next morning, we will remove your plaster mold with fire-proof gloves and tongs.
The next step is to melt your metal of choice and hand-pour it into the mold. So, for example, if you want a gold ring, your designer will use a welder’s torch and a crucible to hand melt the gold and then hand-pour that liquid gold into the plaster mold. Getting this part of the process right is extremely tricky - it takes a highly skilled jeweler to make sure that there are no air bubbles or impurities.
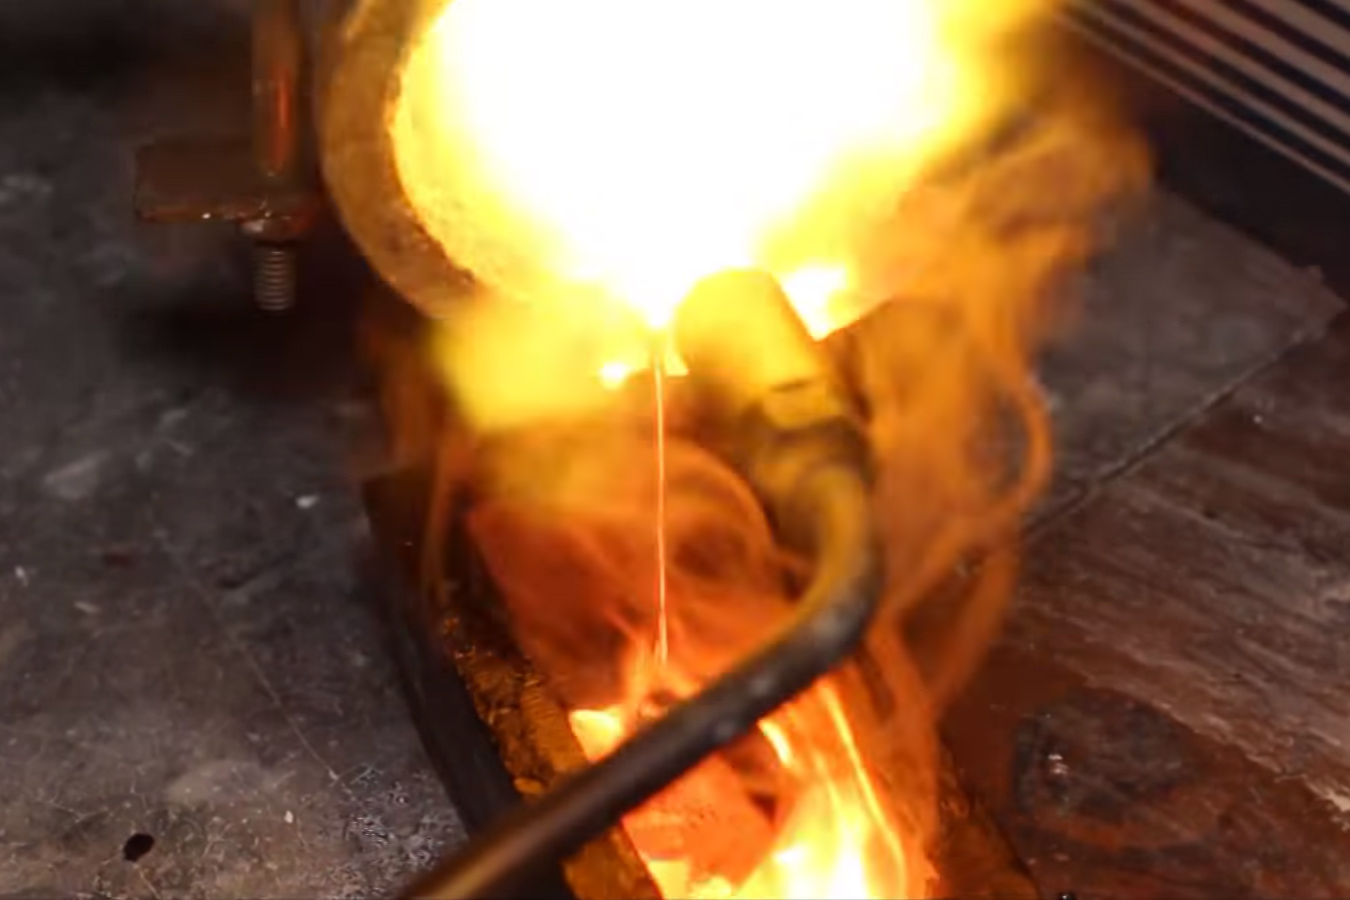
This process is called “Loss Wax Casting,” and we can’t overemphasize how tricky it can be. At this point, our jewelers are wearing the hats of an artist, a designer, and an industrial metal worker.
When all is said and done, we will have created what we consider to be the foundation of your piece - the metal material that underlies whatever stones or engravings that you have specified.

STEP 6: The Finishing Process
Manufacturing Phase

We’ve arrived. This is the last step. Are you with us so far?
The finishing process is where your piece of jewelry will really begin to take the form that you had envisioned. And it is now that your designer’s skills as a jeweler will really come into play.
Every piece of jewelry that we design is different, which makes them very time consuming. The finishing process is long and work-intensive, more so than any other step. It is here that your piece of jewelry will receive the most one-on-one time with your jeweler. The sanding, the polishing, the engraving, the setting of the stones, it ALL happens here.

Our hearts are in our work. If there are hidden impurities or issues—even tiny ones—we will start over. Simple as that.
We have extremely high standards for the caliber of work that we put out into the world, and we will never present you with a piece of jewelry that is anything less than perfect.
The End!
And they lived happily ever after
Starting after you give us the “OK” on your 3D model, this process takes about 6 to 8 weeks. However, be advised that demand in our industry is seasonal. In the time leading up to the Christmas season, the wait-time for our custom jewelry can extend to up to 12 weeks. It’s best to get your order in as early as possible!
So what are you waiting for?
